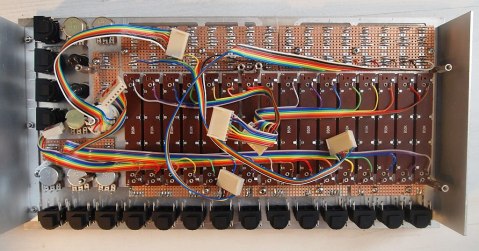
Klee, switched-on cables
Klee is starting to get cabled up!
I chose to go about it using flat cables: These result with somewhat as clean a solution as the “bundle method” which Klee build issue 6 manual suggest using, but without the added work stage of having have to bundle up the cables.
It’s been such a long time since I last did cable crimping, that I conveniently forgot how much I actually hate the task. Starting out it took me about 30 minutes to cobble together the first 8-pin cable! Subsequent cables of course went a lot faster.
Nonetheless, the vexing start made me think that it might be a good idea not to overly annoy myself with this. Build projects are supposed to be fun and all that, right? If I was to approach the work stage by, say, making a maximum of 4 cables per day, it should prevent excess of vitutus maksimus arising (pardon my finnish). This way I’ll have the cables sorted out some time early next week. Good enough pace for me.
Read More…Klee, mech fuckups
What a nice week of milling fuckups with the Klee mech.
After milling the top panel, I noticed I forgot to draw in three SPDT switches. No idea how this slipped past my radar, as I did check the drawings many times prior to milling. Situation was pretty much saved by the fact that I had at least reserved space for the switches. Just add the holes and the project is back on track..
.. or it would be, had I just drilled these holes by hand. Instead, I chose to go all fancy and use the router! Aligning the board on the CNC table for adding these holes was of course a total annoyance, but I got it right eventually.
Just to have a bit of extra crap thrown in, the CNC program decided that these three holes should have a 1mm offset on Y-axis. Something I of course noticed right about the moment the milling bit went in :). No idea why it turned out this way, after all zero location was ok and I did check for it three times. But whatever, the 1mm difference was persistent so I just compensated for it by offsetting the zero location.
Klee, parts parts parts
As it turned out, Farnell UK wanted to sponsor my Klee project a little bit by hooking me up with some parts! Having gone through a good amount of sourcing for this project, this lead me to think about parts in general. As things are on hold anyway until I get the SP8T rotary switch, I might as well go through some of the items I’m planning to use.. Good news is, I do now have a source for the SP8T so I can soon shut up about it. Yay for that \o/
Anyone who’s into DIY electronics (or repairs) probably knows that selecting and sourcing all the bits & bobs needed can (more than often) prove bit of a headache. Building up knowledge of reliable/usable parts sources takes time and any short-comings here can easily bring a project to a halt. Not that every shop stocks every single part you might need either.. Add things like specific part properties or plain ‘meh, done that already‘ to the mix, and you’re instantly in need of a wider shop selection.
Klee, panel sketch #2
Nearing final version with the panel layout! For this one, the overall width narrowed down to about 34cm, so the final enclosure should definitely fit well within “desktop limits” too.
Next up on the “design menu” would be completing the sub-panel design. This will most likely require some minor adjustments to the layout too, as I’m yet to completely factor in all parts according to their third dimension too. Let’s see how tricky this gets.. Draftsight is 2D, so all the “3D” has to be done with physical items, pen and paper.
Parts-wise I’m still stuck looking for that (damn) SP8T switch, so the current layout is dimensioned according to a SP12T Lorlin rotary. In the picture above, this is the biggest circle immediately to the right of slide potentiometers. Hopefully these rotary switches come in enough a standard size, that leaving a clearance of few millimeters around the part will make most variants fit!


Recent Comments