Battery leakage cleaning
I’m quite sure anyone who has done even the slightest bit of electronics repairs has pretty come across battery leakage damage. On such a case, some internal battery (realtime clock, memory refresh etc.) has leaked all over the circuit board and corroded traces, component feet or even the board itself! This corrosion can cause poor conductivity (increased resistance), short-circuits or cuts on signal paths. I deal with various types of board repairs all the time, so I thought maybe my methods of cleaning up these leakages might be off interest to someone.
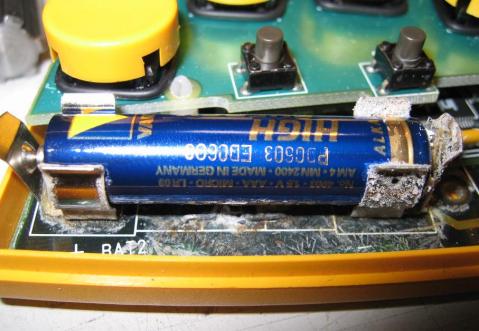
The case I’m about to present was actually a user-originated fault and not the more traditional type of leakage case. Nonetheless, battery acid all over the board and it had had a bit of time to work it’s magic. What had most likely happened in this case was that the end-user had replaced the internal rechargeable batteries with regular ones (the device has a built-in NiMH charger). Not sure how long the unit had actually been in use after the batteries had started failing, but the corrosion suggests it did’t happen overnight. There are two batteries inside the unit, both were rather similar in appearance, thus I’m focusing only on the left-most one. This is how the internals looked like after opening the casing:
Elektor Vocoder, part 2
Moving on with this project, it was finally time to continue by etching the back planes and a few filter boards. Since the UV unit I use for exposing the photosensitive boards (a low-power EPROM eraser) is very far from perfect for this use, the back planes turned out almost a complete failure. Here’s why:
First, low-powered means that a single board has to be kept exposed for around 30-45 minutes to get decent results. Second, this exposure time depends a bit on the brand of the board (different coating solution and/or process per manufacturer, I assume), so whenever I try out a new brand it’s a bit of trial and error. For this batch I had a new brand, of course. Third, as the UV unit is meant for erasing EPROMs it has only a single small lamp, meaning that large boards (such as the backplanes) need to be exposed in several parts. For large boards it’s not uncommon to have overall exposure times as long as 1,5-2 hours with this UV unit! Just for comparison, a real PCB exposure unit handles boards of almost any size in 5-10 minutes per side.
Elektor Vocoder, part 1
Upon stumbling across the documentation for Elektor Vocoder circa 1999, this very complex piece of diy made it to my to-do list immediately. I knew I just had to complete one some day! The project took it’s first step forward when around august 2003 I found a Tandberg TR2075 stereo amplifier in the dumpster. The casing, made almost entirely of thick clear plexi glass, was just something I could not pass up on. Its size and style just made me think of just one thing, the Elektor Vocoder. Bring it on then! I decided that since the casing is all dumpster material, maybe the electronics could also be built using as much recycled parts as possible. Make it a real Vocode-A-Trash Deluxe ™!
As the design is rather old (circa 1980), the first issue prior to etching any boards was to check the combined parts list for obscure/obsolete items. The only difficult ones were the Siemens connectors used to interface all the boards together through the backplane. Despite extensive searching, I didn’t come across suppliers or matching replacements either. Lucky for me, there were plenty of excess 3×32-pin DIN41612 bus/backplane connectors at work waiting to be binned; these were easy enough to modify to match the pin spacing on the boards (verifying against paper prints ftw!). The second issue were the etching masks for the boards. The scans floating around in the net were piss-poor quality jpgs and thus cleaning them up took quite a while. Nonetheless, the editing needed to be done so I’d get my hands on some real boards and see how the whole structure would fit the casing. CAD, now wtf is that.


Recent Comments